Add SAN storage to Microsoft Failover Cluster Fileserver

Blog, Information Technology, Servers

This post assumes that you already created a failover cluster between at least two servers and have already created the file server role.

Note: In my example I am adding 2 disks, one 10 GB and the other 5 GB at the same time.

After you are done creating the volume on your SAN,  we need to connect to it on our two servers via the iSCSI initiator. Open the iSCSI initiator on both servers by clicking Start > All Programs > Administrative Tools > iSCSI initiator. Find the volume you created on the SAN and connect to it.

So, now that we have presented the new disk to all nodes of the cluster, we see the newly connected disk in the Disk Manager set to offline.

Offline

The next step is to bring our new disk online. This only needs to be done on one of the servers in the cluster. It does not matter which server. In Disk Manager, right click the new disk and select “Online”.

Set Disk Online

Now we want to create the new volume as a “New Simple Volume”. Right click the disk and select “New Simple Volume…”

New Simple Volume

Got through the “New Simple Volume Wizard” like you normally would when you are formatting a disk (disk letter, file system, volume label etc.) and click finish. Now your disk manager should show your newly create drives.

New Disks

Now open the Failover Cluster Manager and select “Storage”. In the top right corner select “Add a disk”.

Add Disk

Check your new disks and click “OK”.

Add Disk 2

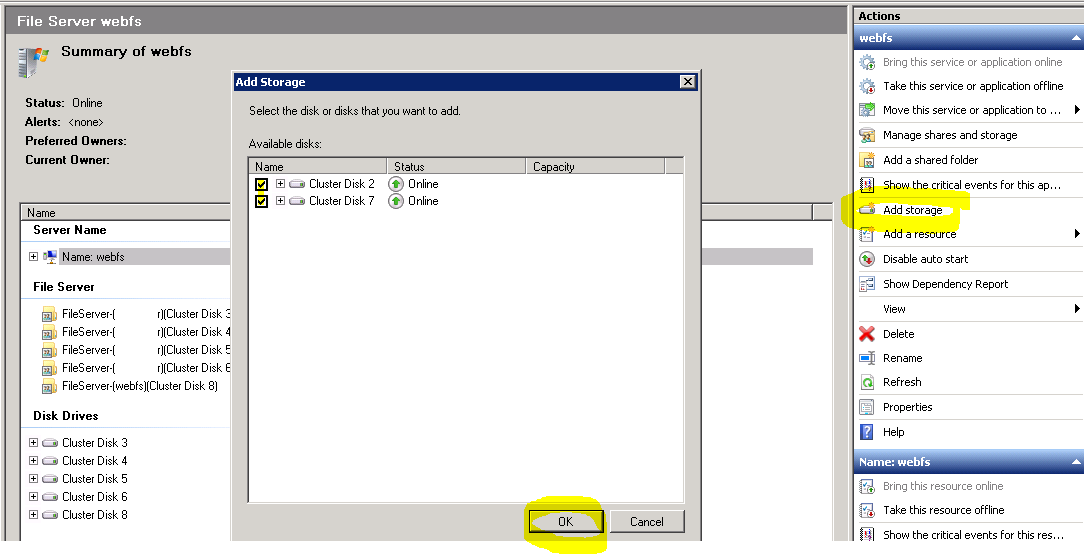
Now we have to add the available storage to our file server. In the Failover Cluster Manager, expand services and applications and select your file server service.

Select Service

On the right hand side of the service under Actions, click “Add Storage”. Check off the new drives and click “OK”.

Add Disk to Service

And that is it.

Server 2008 R2 Failover Clustering

Blog, Information Technology, Servers

One of the neat things about Windows Server 2008 R2 Enterprise is the ability to cluster servers together so that if one server were to fail, the other could pick up the load without the user ever knowing. This makes it so that your company has little downtime when disaster strikes or for scheduled maintenance. Some of the services that failover clustering provides are DHCP Server, File Server, Print Server or a Virtual Machine.

To test out the failover cluster I first made 2 volumes in the Dell EqualLogic PS4000 SAN(Storage Area Network.) One volume is the Quorum disk and the other is the actual volume we wish to store data on. The quorum, in a failover cluster environment, is designed to handle a scenario when there is a problem with communication between the set of cluster nodes so that two servers do not try to simultaneously try to write to the same disk at the same time. If two servers were writing to the same disk at the same time it would result in disk corruption. By having this concept of quorum, the cluster will force the cluster service to stop in one of the subsets of nodes to ensure that there is only one true owner of a particular resource group.

Next, I opened up the iSCSI Initiator in Server 2008 R2 and connected the two volumes on both of my servers.

After creating a new volume in disk management, I opened the Failover Cluster Manager. From there I right clicked “Failover Cluster Manager” and clicked “Create a Cluster.” I went through the setup, added the two servers, made sure they were on the same domain and made sure they passed the validation test. I actually ran into a problem when running the validation. It seems that having both of these 2008 R2 servers on a Windows Server 2003 domain will not pass the validation. I only had 2 servers running server 2008 so I had to make one of the servers run active directory, DHCP and DNS server roles. After I set that up I added the other server to the new test domain and voila, it validated!

The next step I had to do was add the two volumes to the cluster by clicking storage in the left-hand column and right clicking “Add a Disk.”

Once the drives were set up I was able to add a service to the cluster. Right click “Services and Applications” in the left-hand column and selecting “Configure a Service or Application.” I selected “File Server” and the drive I wanted to use. I then gave the service an IP and a Client Access Name.

Now I can configure all the servers that need access to this volume by mapping a network drive and entering the client access name I gave the service before. Now if I need to upgrade RAM or install updates on one of the nodes I can without disrupting any of the machines. No longer will I have to wait until Sunday or late at night (when most users are not using the servers) to update/ upgrade machines.

This service is such a great utility for systems administrators. I can’t wait to dive more into its capabilities.