Note: This guide assumes you have a Windows server, it is joined to a domain and you have an account that is part of the domain admins group.
First we need to install ADFS 2.0
- To install version 2.0, it first needs to be downloaded and installed. Click this link to download the installation file https://www.microsoft.com/en-au/download/details.aspx?id=10909
- Choose the type of installation file based on your OS (I am running Server 2008 R2 so I will choose RTW\W2K8R2\amd64\AdfsSetup.exe). Save the installation file to your Desktop
- Run the exe located on your desktop
- On the Welcome screen, click Next
- Accept the License Agreement.
- I will be setting this ADFS server as a Federation server so I will leave the default of Federation Server selected and I will click Next. Note: you would select Federation server proxy if you were running your ADFS server in something like a DMZ.
- Click Next on the prerequisite software screen. The install wizard will install these automatically if they are not already present on the system. If there are no errors, the software will be installed and the ADFS 2.0 management window will open
The next task is to create a certificate template to use with our SSL certificate
- The first thing you need to do is open the Server Manager (Start > Administrative Tools > Server Manager)
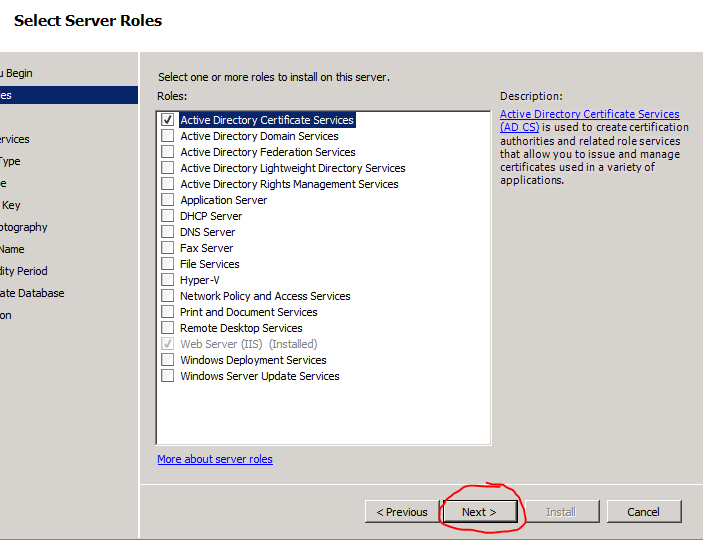
- Select Roles
- Click Add Roles
- Click Next to get past the Welcome Screen
- Check off Active Directory Certificate Services and click Next
- Click Next to get past the Welcome Screen
- Click Next on the Role Services page
- Leave the default of Enterprise selected and click Next. Note: if Enterprise is not an option, you must log out of the server and log back in using an account that is a member of the Domain Administrators group.
- On the next page you need to decide between choosing a Root CA or a Subordinate CA. Select Root CA if you are OK with using a self-signed certificate for your ADFS instance. Select Subordinate CA if you would like to purchase a certificate from a 3rd party certificate authority. I will be using a self-signed certificate so I will select Root CA and click Next.
- Click Next on the Private Key page to create a new private key.
- Choose the type of cryptography you would like to use on the next page. I will leave the default of SHA1 with a 2048 bit key character length, but you can choose whatever you want. Then click Next
- Click Next on the CA Name page
- Choose how long you want the certificate to be valid. I will leave the default of 5 years set. Click Next
- Click Next on the Certificate Database page
- Click Install to finish and then close the wizard when complete
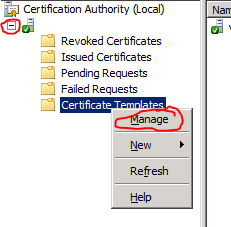
- Next open up the Certificate Authority (Start > Administrative Tools > Certificate Authority)
- Expand your server on the left column, right click Certificate Templates and click Manage
- Scroll down to the end of the list, right click Web Server and click Duplicate Template
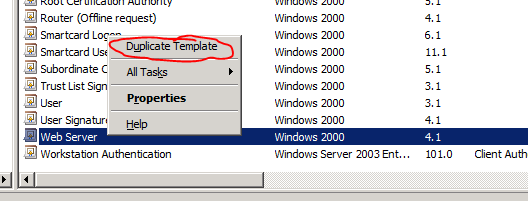
- Select Windows Server 2008 Enterprise and click OK. Note: you would select Windows Server 2003 only if you had 2003 servers on your network that needed to access the ADFS services.
- Give the template a name (ex: ADFS SSL Certificate)
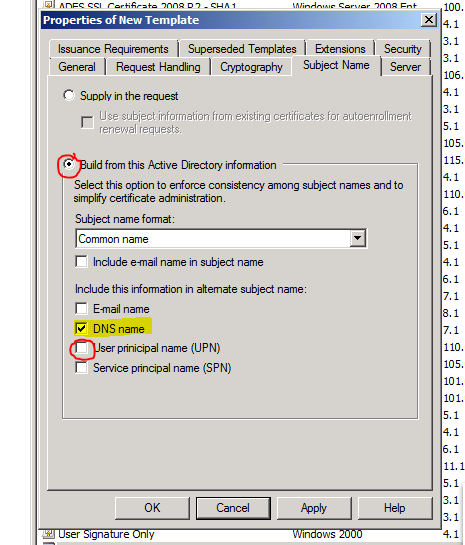
- Next click on the Subject Name tab at the top.
- Click the Build from this Active Directory information radio button, select Common Name from the subject name format dropdown, uncheck User principal name (UPN) and check DNS name
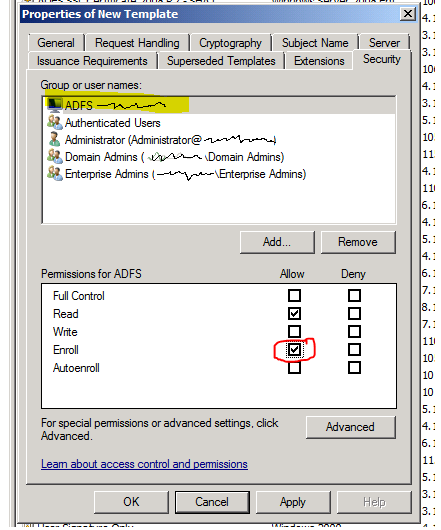
- In order for the ADFS server to obtain a certificate, it needs to have the correct permission set up to do so. To do this, select the Security tab at the top.
- To add the required permissions, click the Add
- Click the Object Types… button, check Computers on the newly opened window and click OK.
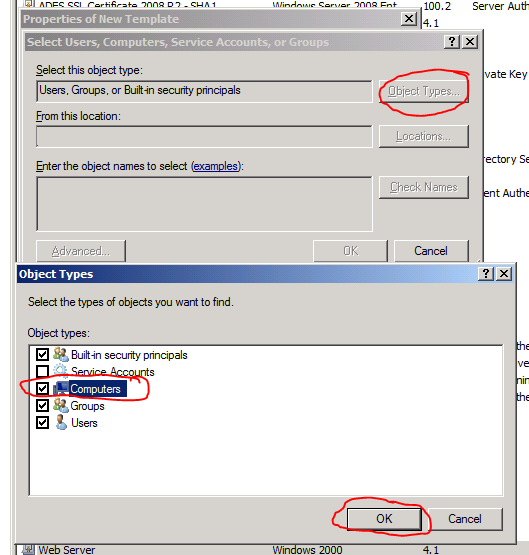
- Enter the name of the server that you previously installed ADFS on and click OK. The server will be added to the permission list.
- Next we need to set Enroll the allow permission for this particular server. Check Enroll and click OK
- Now we need to make this certificate template is available to be used to issue certificates. To do this, open up the Certificate Authority window again (Start > Administrative Tools > Certificate Authority)
- Right click the Certificate Templates icon in the left column, hover over New and click Certificate Template to Issue
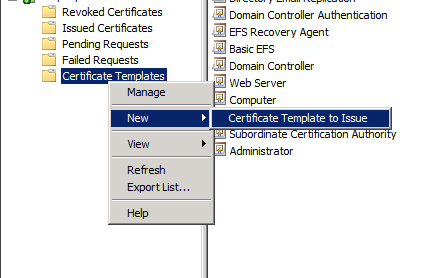
- Select the name of the template you made previously (in my example I made it ADFS SSL Certificate) and click OK.
The next task is to create a SSL certificate on the server that is compatible with ADFS
- Open up a management console window on your server (Start, type in mmc.exe and hit enter)
- Click file and click Add or Remove Snap-ins
- Highlight Certificates and click Add

- Select Computer Account and click Next and then click Finish
- Now that the options are configured, click OK
- On the Console window, click View and then select Options
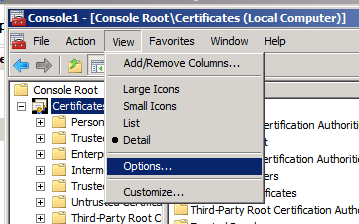
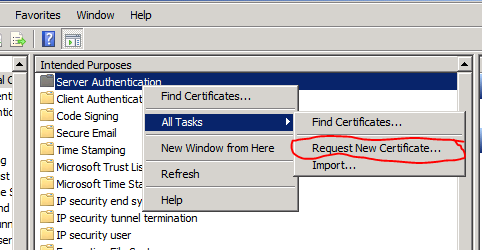
- Select Certificate purpose and then click This will allow us to view the computer’s certificate by their purpose.
- In the Intended Purposes view, right click Server Authentication, hover over All Tasks and click Request New Certificate
- Click Next on the welcome screen.
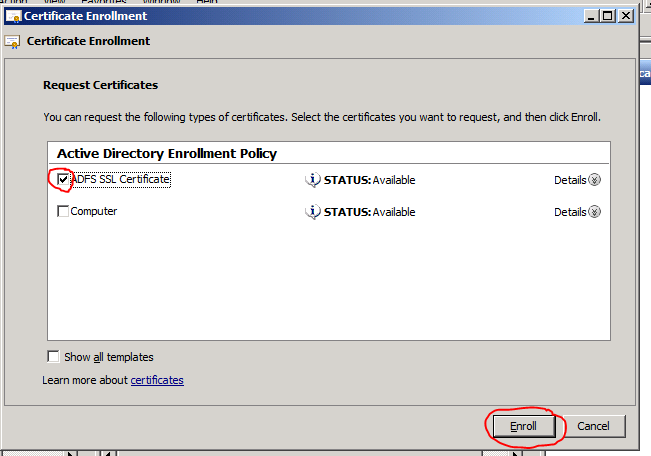
- Click Next on the Select Certificate Enrollment Policy
- Select the template you created before (ex: ADFS SSL Certificate) by checking it and clicking Enroll.
- Click Finish and close all of the open windows.
The next task will be to configure ADFS
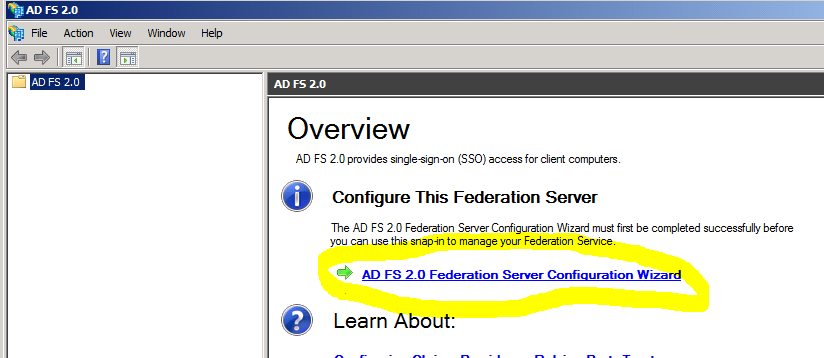
- Open up ADFS management (Start > Administrative tools > AD FS 2.0 Management)
- On the ADFS 2.0 management window, click ADFS 2.0 Federation Server Configuration Wizard
- Leave the default of Create a new Federation Service selected and click Next
- On the Select Deployment Type page, select Stand-alone federation server and click Next
- Make sure your SSL certificate is selected on the Federation Service Name page and click Next
- Click Next on the summary screen and wait for the wizard to complete.
- One the wizard is finished, click Close. Now ADFS is installed and ready to be used.